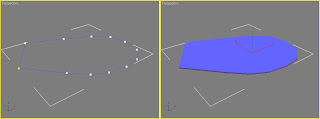
To begin my image I used the spline tool to create the lake. I used this tool as I felt a standard shape, such as a cylinder or box, would be unsuitable as lakes are not geometric shapes. To begin with I used the line tool to draw the shape I wanted. I included many vertex’s which were close together so that I could make all the slight alterations I needed once I had closed the spline and found this very useful.
 Once I was happy with the shape I converted it to an editable poly before selecting the polygon button and extruding it to give slight depth. I was very happy with the outcome of the image at this point and so decided to continue with the next stage.
 At this point I decided to create the shrubbery in the background. To do this I used a sphere. The initial shape I drew was too large in comparison to the lake and so I reduced the radius to solve this problem. I then made it into an editable poly and used the soft selection tool to deform the object and make it appear to be a more unique shape. This took quite some time as I struggled to create the shape I was looking for as all I was able to produce was an egg shape. From changing the controls I learnt that lowering the falloff value enabled me to change the size of the soft selection area and eventually create the uneven surface similar to what I was looking for.
 Next I decided to try to create a willow tree. To start this I used a cylinder for the trunk as I felt this would be the most suitable shape to use.
 I then decided to create the branches separately and to do this I used a cone. I made the cone very long which finished with a fine point.
 Afterwards I added the leaves to the branch. To create the leaves I used the spline technique as when I have used this in the past it worked well. I started this using the line tool to draw out a rough leaf outline and then edited the vertex’s to get the initial shape exactly as I wanted it.
 From here I made it an editable poly and extruded it to give it a depth I felt was suitable. I then aligned the leaf with the branch by moving and rotating the object until I was pleased with its position.
 Afterwards I cloned the leaf and re-arranged each one along the branch. I did not want the branch to appear too structured and so I tried not to place the leaves too evenly and also rotated some of the leaves so they were at different angles. Once I had placed the leaves along the whole of the branch I applied a bend so I could create the drooping effect of the branches. At this point I was quite pleased with the appearance of the branch and so decided to continue with my image.
 I then cloned the branch several times and arranged them on the trunk of the tree. To do this I used the move and rotate tools to create some variations in the positions of the branches to give the tree a more realistic aspect. I am reasonably pleased with the appearance of this part of the image.
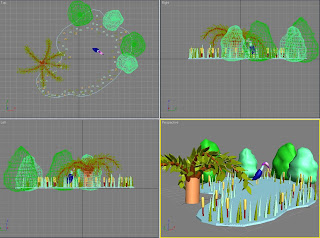
 Afterwards I continued with the background by adding more trees. I used the same method as I did previously as this went quite well. I started by drawing a sphere and made the radius similar to the first as I felt this would keep the trees in similar proportion. Then I made it an editable poly and used the soft selection tool to create an uneven surface. With some perseverance I managed to get the following outcome.
 I then cloned the two trees, rotated them and arranged them in different positions around the lake.
At this point I decided to add the grass to the lake. I chose to use a cone for this with a very fine point as I felt this would be the most suitable to create the shape I was looking for. I tried not to make the bottom radius too large and make the cone quite high so there was a gradual decrease in radius from bottom to top.
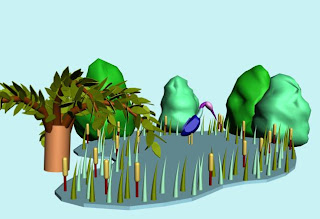
 When I was happy with the proportions I placed the grass blade into the scene and then cloned it many times. I used two shades of green for the grass to try to add some realism. Also, I arranged them around the edge of the lake at uneven intervals for this reason. When I looked at the image as a whole I felt the blades of grass were too rigid and so I applied a slight bend to the cone and rotated a few of the blades so they were not too regimented.
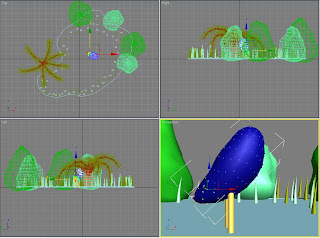
 I felt the next step for this image was to create the heron. I decided to place this in the middle of the lake to try to create a focal point in the image. To start this I created the legs using a cylinder. I made these quite long and narrow so they appeared to be quite realistic.
Next I created the bird’s body. To do this I used a geo-sphere as I felt it would be the most suitable to edit into the shape I wanted. I used the soft selection tool to reshape the back of the sphere and create the tail, and then rotated the stretched part to the angle I wanted. Then, I re-modelled the shape slightly at the top to lead into the neck. When I was happy with the body shape I placed it over the legs.
 The next stage was to create the neck. For this I used two cones so I could create two bends in different directions but still have the gently narrowing shape as the neck went closer to the head. I made sure the joining point was level by having the same radius at the top of one and bottom of the other cone and by aligning them carefully. After this I then used another geo-sphere to create the head. For this I drew the basic sphere shape which was in proportion with the neck and body and then used the soft selection tool to edit the shape. I firstly lowered the falloff value so less of the sphere was edited and extended the front of the head before flattening the base by raising the underneath. I had to select the areas and edit each a couple of times before I got exactly what I wanted, however I am pleased with my eventual outcome.
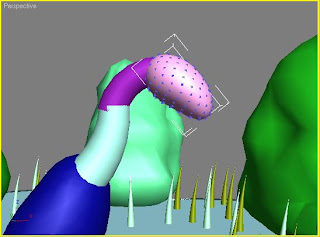 The last step of creating the bird was to add its beak. I chose to use a cone for this and drew it with a fine point to make it quite long so it looks lifelike. I am pleased with how this turned out as once I reduced the height to 14.614 it was proportional and worked well with the other parts.
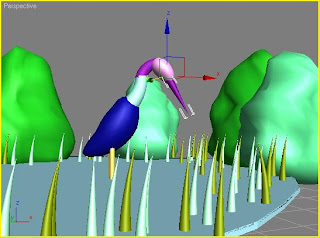 When I zoomed out and viewed the image as a whole I was slightly disappointed as the heron was too big in comparison to the rest of the scene and so I scaled these objects until they were the right size.
At this point I evaluated the scene as a whole and felt the grass did not look quite right. Due to this I added some reeds to the water so I could give a greater variety of plants and try to make it more realistic.
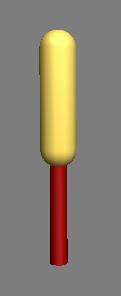 To create this I used a cylinder for the stalk ad a capsule for the top. I made the radius of the stalk quite narrow so when I created a larger bud at the top the two would still be in proportion to the grass already in place. When I did align the reed within the image it was still slightly too large and so I scaled it while still keeping the two parts in proportion. When I was happy with the size I cloned the objects and placed them randomly in the scene so it would appear to be part of a normal landscape.
 The last of my work on this image for this week was to create the bird’s wings. To do this I used the spline technique as I felt it would be the best way to get the shape I required. I started this by using the line tool to draw out the outline of the 2D shape. I used many vertex’s to create it as it would make editing easier once the spline was closed. Once I edited the shape to a point where I was happy I converted it to an editable poly, selected the polygon button and extruded it slightly to create a third dimension before capping the back edge.
 To finish this part of the image I reduced the size by scaling it and placed it next to the body. Lastly I cloned the wing and placed another on the other side of the body.
 To continue this image I firstly need to add some more wildlife, mainly by adding insects to the scene. Also, after looking at the willow tree again I feel this needs further work including more branches and the leaves need to be resized slightly.
No comments:
Post a Comment